DIY camper wheel well tips

One of the biggest unknowns to me in designing a camper was the suspension. In particular, I’ve never been quite sure how tall to build the camper wheel wells. Since they occupy room inside the camper, I wanted to keep them as short as possible. Usually I followed a conservative path by making the wells taller than what I imagined they needed to be.
On this camper, I got distracted when building the wheel wells. This is what happens when you work in your driveway and your next door neighbor (who never leaves a word unspoken) starts yammering away. Then you misread your notes, cut the wells too short and stick them on (with glue) without thinking about it.
After fitting the wheels and tires on, it looked like those wells might be a bit short. I found 1.25″ of clearance between the top of the tire and the underside of the wheel well. That seemed a bit too close. It would be nice to know what the full deflection of the suspension would be. Then I’d be able to insure the well was tall enough, but not too tall.

When in doubt, look it up
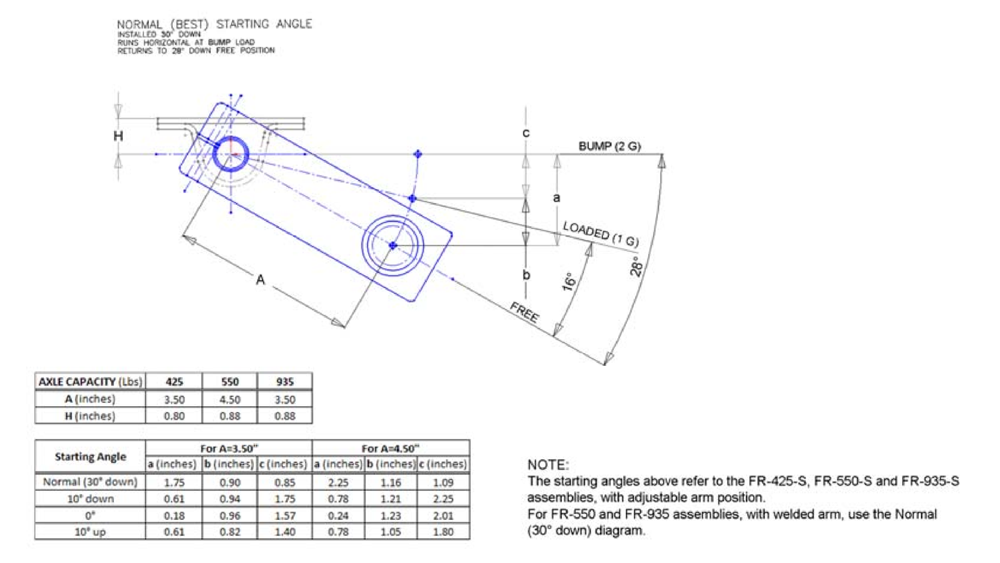
I found the information needed on the Flexiride site. A section on technical information revealed the drawing and table at the top of the post. This included the torsion suspension in different preload settings (I stick with the normal setting, upper left). Value “a” in the table shows the total amount of vertical movement when the axle stub hits a bump. On the 550 axle stub I use, that value is 2.25″.
If I hadn’t glued the first wheel wells in place, I could have pulled off the too-short ones and replace them with taller ones. But I glued them to the base to provide a weather seal. This made a remedy a little more complicated, but it ended up being easier than I thought. First, I cut the tops out of the wheel wells. The tops are 1/4″ material, so its easy to cut. Then, I made wheel well extension caps to fit over top. shallow boxes of the same length x width. After gluing up the parts and making the caps, I primed and painted the exposed underside of the caps. I then put down a bead of caulk and set them in place.
I have two tips to share: 1) avoid any steps involved in cutting or assembly when you are distracted by a chatty neighbor and; 2) refer to the manufacturers tech specs to design wheel wells that have adequate clearance.
Questions?
For more information about this camper you can contact me through this page.
My business is selling motorcycle campers and trailers and the gear you need to tow them with a motorcycle or trike. I run two sites: Open Road Outfitters and US Hitch.